- Noor
- Aug 5, 2024
- 3 min read
Updated: Aug 19, 2024


Hello, fellow hobbyists, and especially to polymer clay enthusiasts.
After rediscovering my creative mojo, I have returned from my polymer clay hiatus with a renewed zest and a burning desire to create. I have decided to kick things off by crafting some stunning brooches to add to my personal collection, perfect for complementing my hijab. So, let's roll with the polymer clay and get those creative juices flowing.
Scouring tutorials online, I stumbled upon a fascinating and innovative technique that some artisans playfully referred to as 'choppy chop-chop '. Eager to dive into this new technique, I sifted through my polymer clay collection from yesteryears and brainstormed some color combination ideas that would beautifully complement this unique technique, potentially giving my brooch a one-of-a-kind identity. For this technique, I needed a lot of translucent clay, which I ran out of, so I ordered Sculpey Premo translucent 80z. The anticipation of trying out this new technique was palpable.
With my creative energy still at its peak, I embarked on my first project using white Sculpey Premo. After the 'choppy chop-chop' process, I applied a layer of black acrylic paint and added gold foil once it dried. While the gold didn't stand out as much as I had anticipated, I was pleased with the marbled effect and the subtle hint of shimmering gold. This experience was a valuable lesson in the unpredictability of artistic processes and the importance of embracing the unexpected.
Excited by my success, I experimented with Sculpey Premo black and paired it with White Gold Glitter (5132). After the choppy chop-chop process, I covered it with silver acrylic paint, and once dried, I added silver foil. I liked how it turned out. There is a subtle hint of glitter that is accentuated well with black.
Encouraged by these initial successes, I decided to push my boundaries further. I began by blending colors with Sculpey Premo translucent, starting with three shades of red from my leftover stash. After the 'choppy chop-chop' process, I was pleased with the result. This success inspired me to experiment with alcohol ink on translucent clay. I carefully dropped varying amounts of gold alcohol ink on three slabs of translucent clay to achieve a multi-tonal effect. The outcome was unexpectedly delightful, resembling a faux stone with a rough texture that mimics real stone.


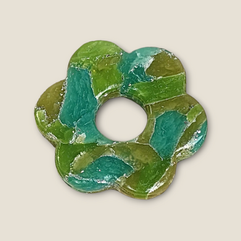
Continuing with the same technique, I divided translucent clay into three small blocks. I then blended three different shades of green with each block of translucent clay, creating a blended gradient by rolling the two colors together using a pasta machine. I was really happy with how the three colors turned out. Awesome. Next, I spread acrylic paint onto each clay slab and let them dry. After that, I choppy chop-chopped the slab into smaller pieces, gathered those pieces, and added silver foil. I squeezed those pieces tightly into a block, making sure that there were no gaps. Using my thin blade, I sliced the clay block evenly (I tried) with a thickness of about 5mm for each slice. I loved how the marble effect turned out. It was pretty. Then I arranged the slices together side by side to form a nice pattern flow, and using a flower cutter, I cut it into shape. In a pre-heated toaster oven, my flower brooches (I made two pieces) baked at 130C for 50 minutes. Just to note, the color darkened after baking. After cooling off, I used sandpaper, starting with 500 grit and working up to 5000 grits.
The finale would be to coat it with glaze. While many polymer clay artists use UV-led resin for a glassy effect, I prefer using FolkArt’s polyurethane glaze. I love it when it dries naturally within an hour, allowing me to apply a second coat if needed. I have used this glaze in many previous projects, and it has lasted well throughout the years. The gloss adheres to the surface, giving it a natural shine.
These green brooches are my best work so far. The different shades of green give them a jaded stone look with a hint of glistening sparkle in between the crevices.
Although these brooches are for my personal collection, I am considering making more for sales. Look out for it on my social media for more updates. In the meantime, happy crafting!
Enjoy and have fun.
Making it pawsible,
Noor
A Pawsome hobbyist
PS : I would like to thank all the polymer clay artisans for without their dedication, I would not have gotten this right.

Comments